Cleaning Battery Corrosion from Old Handhelds

Battery corrosion is the silent killer of vintage handheld gaming, turning a pristine Game Boy or Game Gear into a paperweight. This post explains how to identify, neutralize, and remove alkaline leakage from battery compartments to save your collection. We'll look at the chemistry of the mess, the tools you need, and the safest way to clean metal contacts without destroying the internal circuitry.
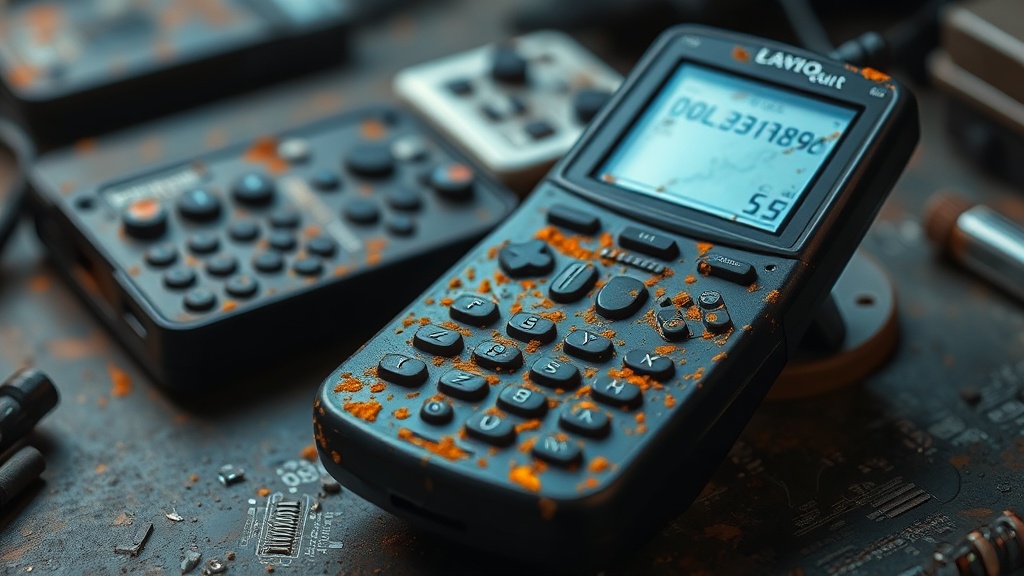
A crusty, white powder sits inside your battery compartment. It looks like salt, but it's actually a chemical byproduct that can eat through metal. If you don't act quickly, that corrosion spreads from the spring terminals to the mainboard. It's a mess, but it's also a solvable one.
What Causes Battery Leakage in Handhelds?
Leakage occurs when the alkaline batteries inside your device fail or expire, causing the internal pressure to force potassium hydroxide out of the cell. This substance is highly alkaline and quite caustic—meaning it can burn your skin if you're careless. Most of the time, this happens when a device sits in a drawer for years without fresh batteries. The chemical reaction between the leaking electrolyte and the metal terminals creates that signature white, crusty buildup.
It's important to understand that this isn't just dirt. It's a chemical reaction. If you try to scrape it off with a dry screwdriver, you might actually be making things worse by scratching the plating. You need to neutralize the acid (or in this case, the base) before you start scrubbing.
Most collectors find that this issue is most common with older, non-rechargeable AA or AAA alkaline batteries. Lithium-ion batteries are much more stable, but if you're hunting for rare variants of the original Game Boy, you'll likely encounter a lot of old alkaline residue.
How Do I Clean Battery Corrosion Safely?
To clean battery corrosion safely, you must use a neutralizing agent like white vinegar or lemon juice combined with a cotton swab and isopropyl alcohol.
First, grab your supplies. You don't need a professional lab kit, just a few household items. Here is a quick checklist of what you should have on your desk before you start:
- White Vinegar or Lemon Juice: This acts as the neutralizer for the alkaline leak.
- 90% or higher Isopropyl Alcohol: Essential for cleaning off the residue and drying the area.
- Cotton Swabs (Q-tips): For precision application.
- Small Screwdriver: To open the battery door or the device itself.
- An Old Toothbrush: Great for scrubbing the stubborn bits out of the springs.
- Safety Gloves: Because, well, it's caustic.
The process is simple but requires patience. Don't rush it. If you're too aggressive, you'll snap the tiny spring-loaded terminals that hold the batteries in place. That's a nightmare to fix.
Step-by-Step Cleaning Procedure
- Open the compartment: Remove the battery door and any remaining battery components. If the battery is stuck, don't force it; use a tiny bit of vinegar on a swab to loosen the crust first.
- Neutralize the leak: Dip a cotton swab in white vinegar. It should be damp, not dripping. Gently dab the white powder. You might see a tiny bit of fizzing—that's the acid/base reaction working.
- Scrub the terminals: Use an old toothbrush dipped in a tiny bit of vinegar to scrub the spring and the metal contact plates. This gets into the crevices where the swab can't reach.
- Rinse with Isopropyl Alcohol: This is the most important part. Once the white powder is gone, the area is still wet with vinegar. Dip a clean swab in high-percentage isopropyl alcohol and scrub the area thoroughly. The alcohol helps evaporate the liquid and removes any leftover residue.
- Dry and Inspect: Let the compartment air dry completely. Do not put batteries back in while it's even slightly damp.
If the corrosion is deep inside the device—meaning it hit the motherboard—you're in much deeper water. At that point, you'll likely need to open the entire shell. For most people, though, cleaning the terminals is enough to bring a dead device back to life.
Can I Use Water to Clean Battery Leaks?
No, you should never use plain water to clean battery corrosion because water does not effectively neutralize the alkaline residue and can lead to further oxidation. Water can also cause short circuits if it seeps into the internal components of the handheld. Always use an acid-based neutralizer like vinegar or a high-percentage alcohol to ensure the area is chemically stable and dries quickly.
Water is a poor choice for a few reasons. First, it's not an effective solvent for the caustic salts left behind by alkaline batteries. Second, if you're working on a device like a Nintendo Game Boy, moisture is your enemy. Even a tiny amount of water trapped under a metal contact can lead to long-term rust or even a short circuit if you power it on too soon.
A quick comparison of cleaning agents helps clarify why we use specific chemicals:
| Substance | Effectiveness | Risk Level | Best Use Case |
|---|---|---|---|
| White Vinegar | High (Neutralizes Base) | Low (Use sparingly) | Initial removal of white powder. |
| Isopropyl Alcohol | High (Drying/Cleaning) | Very Low | Final rinse and drying. |
| Tap Water | Very Low | Medium (Rust risk) | Avoid for electronics. |
| Bleach | Dangerous | Extreme (Corrosive) | Never use on electronics. |
The goal is to leave the metal as clean as possible. If the metal looks dull or dark after cleaning, it might be due to oxidation. You can sometimes restore the shine by gently rubbing the contact with a pencil eraser or a tiny bit of fine-grit sandpaper, but be extremely careful not to remove too much material. You want to clean the surface, not destroy the contact point.
One thing to watch out for: if you see green or blue-ish corrosion, that's often a sign of copper oxidation. This is a bit more serious than the white alkaline crust. If the corrosion has reached the circuit board, the device might be beyond a simple cleaning. It's a tough reality of the hobby—sometimes, the damage is just too deep. But for 90% of the "dead" handhelds I see, a good vinegar soak and an alcohol rinse do the trick.
After you've finished, always use high-quality, name-brand batteries. Avoid the cheap, no-name alkaline packs from discount stores. If you're worried about leaks, consider using rechargeable NiMH batteries (like Eneloop) or Lithium batteries, which are much less prone to leaking than standard alkaline cells. This keeps your collection safe for the next decade.
Steps
- 1
Remove Batteries and Safety Prep
- 2
Neutralize with White Vinegar or Lemon Juice
- 3
Scrub the Terminals Gently
- 4
Dry and Test